
Guide
How to check an old phone, install reTONE, add music, and use each screen.
Get ready
A phone that has not been used for a long time may have a worn-out battery. Check its condition before use, and check it from time to time while you use it.
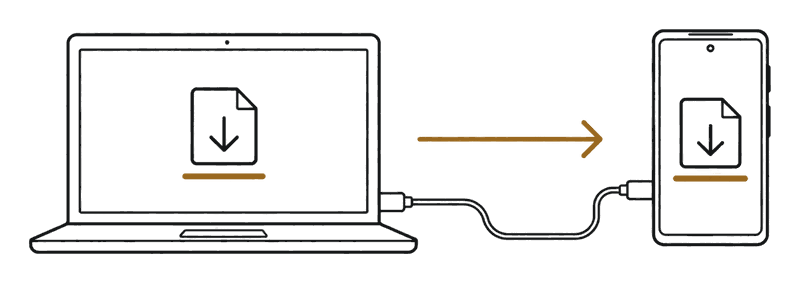
- A phone running Android 4.0 or later
- A computer and a USB cable
- A charger that fits the phone (in Japan, one with the PSE mark)
- Music files (FLAC, AAC, MP3, DSD, and more)
Detailed steps and cautions
Please read this before you start.
Check the battery
A phone that has not been used for a long time may have a worn-out battery. Check the following before use, and from time to time while you use it.
- The back cover or screen is lifting, or there is a gap
- The phone wobbles on a table, or the body looks swollen
- The phone gets too hot to hold while charging or playing
- The battery drains quickly, the charge level jumps suddenly, or the phone turns off without warning
reTONE cannot check how worn the battery is or what condition it is in. Please check the condition of the phone yourself.
If you notice swelling or unusual heat
Do the following, in this order.
- Stop using and charging the phone at once.
- Unplug the charger.
- Put the phone somewhere away from anything flammable.
- Contact a repair shop or the store where you bought it.
Do not press, bend, or puncture the phone.
When you charge
- Use a charger and cable that fit the phone (in Japan, ones with the PSE mark).
- Do not charge the phone on bedding or near anything flammable.
- When you charge a phone for the first time in a long while, keep it where you can see it.
- Keeping the phone plugged in for long periods may wear out the battery faster.
- Do not leave the phone in hot places, such as a car in summer.
When you dispose of a phone
Do not throw away a phone with a battery in the regular trash. Follow your local rules, or use a collection program at a mobile phone store.
When you connect to Wi-Fi or another network
Older versions of Android, and phones whose manufacturer has ended updates, still have known security vulnerabilities that won’t be fixed (you can check under "Android security patch level" in Settings). reTONE does not need a connection for playback. Once the phone is on Wi-Fi or another network, apps other than reTONE can use the internet too.
If you connect, we recommend using the phone like this:
- Connect only to Wi-Fi you trust, such as at home
- Turn Wi-Fi on only when you need it, and off again when you're done
- Use your everyday phone for browsing and email (Chrome no longer receives updates on versions earlier than Android 10)
- Install only apps from trusted sources
- Don't sign in to your everyday accounts or store personal information (reTONE works fully without signing in or creating an account)
Connecting is at your own discretion and risk. The developer is not responsible for any damage arising from vulnerabilities in the phone. While "Network features" is off in Settings (the default), reTONE does not use the network.
We recommend that you download the APK (the file used to distribute Android apps) on a computer and copy it to the phone over USB.
Install
We recommend that you download the APK on a computer and copy it to the phone over USB.
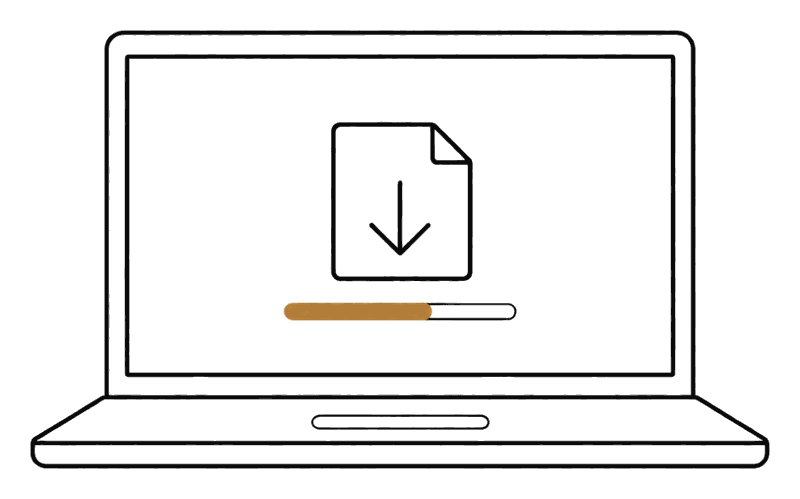
Download the reTONE APK to your computer from the Releases page.
Connect the phone to your computer and choose "File transfer (MTP)". Copy the APK to the phone's "Download" folder.
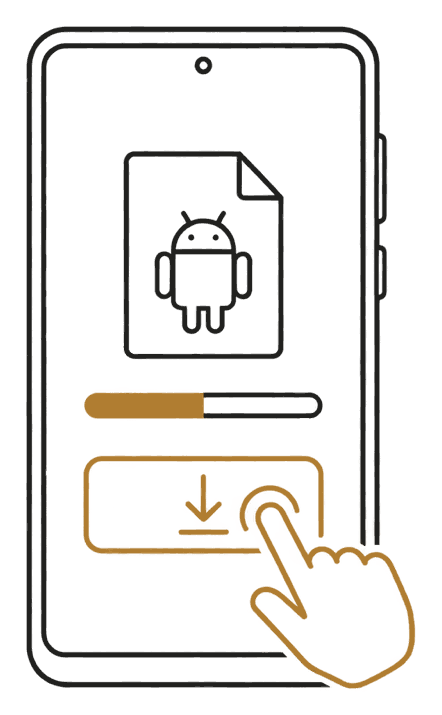
Open the Download folder in a file manager app and tap the APK. Answer Android's prompts, then tap "Install".
On Android 7 and earlier, allow "Unknown sources". On Android 8 and later, allow "Install unknown apps". You can turn the setting back off when you are done.
Detailed steps and cautions
1. Put the APK on the phone
reTONE is distributed as an APK. There are two ways to put it on the phone. For phones running Android 9 or earlier, we recommend Method A (see "When you connect to Wi-Fi or another network" for why).
Method A: Download on a computer and copy over USB (recommended)
You need a computer and a USB cable to connect the phone to it. The phone also needs a file manager app.
- On your computer, open the Releases page of this site.
- Click "Download APK" and save the APK to your computer.
- Connect the phone to your computer with the USB cable.
- When a USB notification appears on the phone, choose "File transfer (MTP)". This is the connection mode that lets the computer read and write files on the phone.
- On your computer, copy the APK to the phone's "Download" folder. If you use a Mac, see "If you use a Mac" below.
- On the phone, open the "Download" folder in the file manager app.
- Tap the APK.
The install screen or an Android prompt appears. Continue with "2. Allow the installation".
TipIf you use a Mac
When you connect an Android phone to a Mac over USB, it does not appear in Finder by default. Android phones exchange files with a method called MTP, and macOS does not support it out of the box. Copy the APK and your music in one of these ways.
- Install an app on your Mac that supports MTP. Free options include OpenMTP. It is developed by an individual and is not related to reTONE. If you install it, download it only from its official site (linked above). Android File Transfer, which Google used to offer, is no longer available.
- Use an SD card. Insert the SD card into your Mac, copy the APK and music, and put the card back in the phone (for phones with an SD card slot).
- If you are comfortable with computers, you can also install and copy files with adb. See "Use adb" for the steps.
- If the phone has no file manager app, you can install directly from your computer with adb (a tool from Google for controlling Android phones from a computer). See "Use adb" on this page for the steps.
- On Android 10 and later, you can also use Method B.
Method B: Download in the phone's browser (Android 10 and later)
The phone must run Android 10 or later and be able to open this site in its browser. On earlier versions, the Chrome browser no longer receives updates, so we recommend Method A.
- In the phone's browser, open the Releases page of this site.
- Tap "Download APK".
- When the notification says "Download complete", tap the notification.
The install screen or an Android prompt appears. Continue with "2. Allow the installation".
TipIf the download notification disappeared
If you dismissed the notification without tapping it, open the APK as follows.
- Open the phone's "Downloads" app, or the "Download" folder in a file manager app.
- Tap the reTONE APK. The file name includes the version number, such as "reTONE-0.86.0.apk" (the screenshot is an example; your version number will differ).
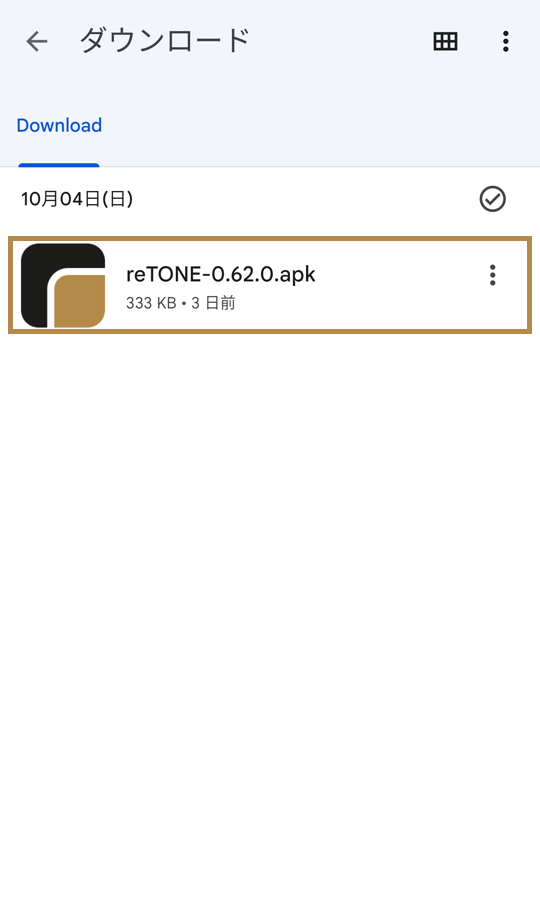
The reTONE APK in the Download folder of a file manager app
2. Allow the installation
Android asks for permission once before you install an app from outside Google Play. Do one of the following, depending on the screen you see.
Android 7 and earlier
If you see "Install blocked" when you open the APK, do the following.
- Open "Settings" › "Security".
- Turn on "Unknown sources".
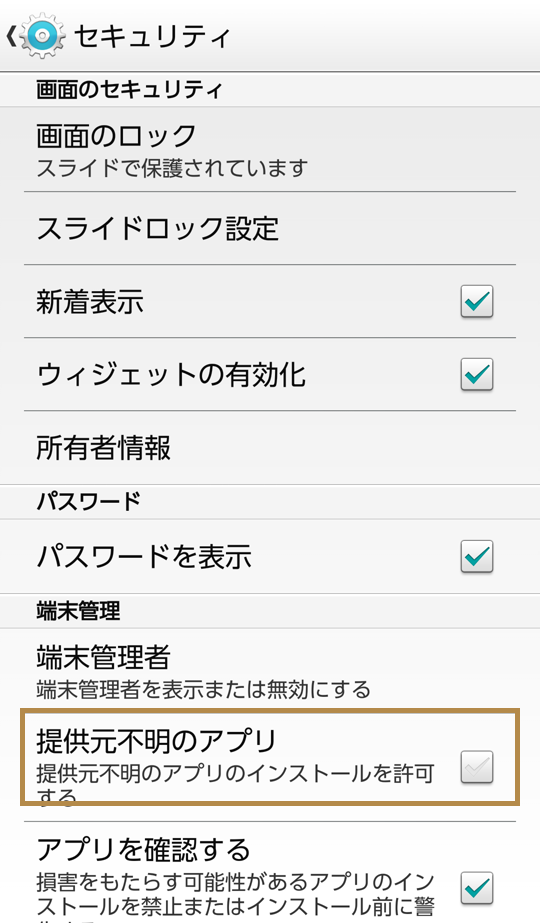
"Unknown sources" in "Settings" › "Security" on Android 4.4 - Open the APK again.
The install screen appears.
Android 8 and later
If, when you open the APK, a screen asks you to allow "Install unknown apps" for the app that opened it (a browser or a file manager app), do the following.
- Tap "Settings".
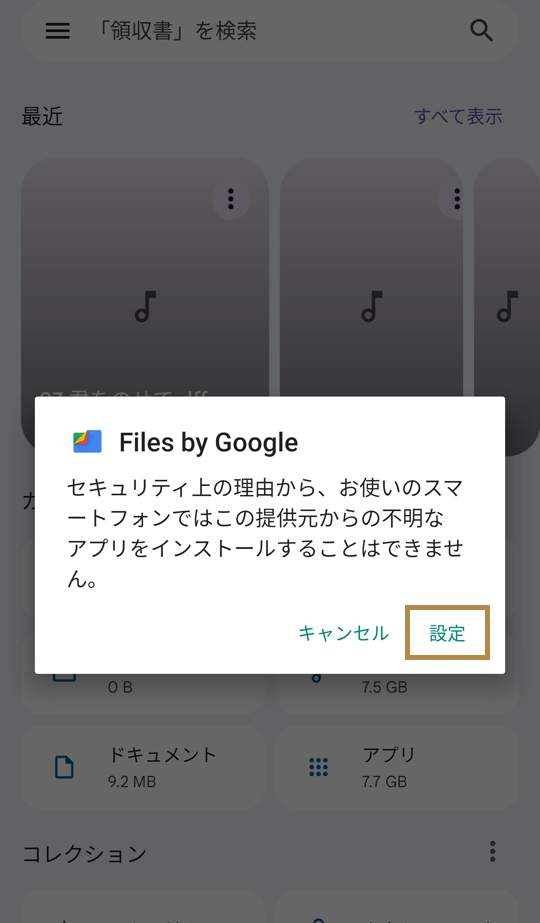
The screen saying the app cannot be installed, shown when you tap the APK - Turn on "Allow from this source".
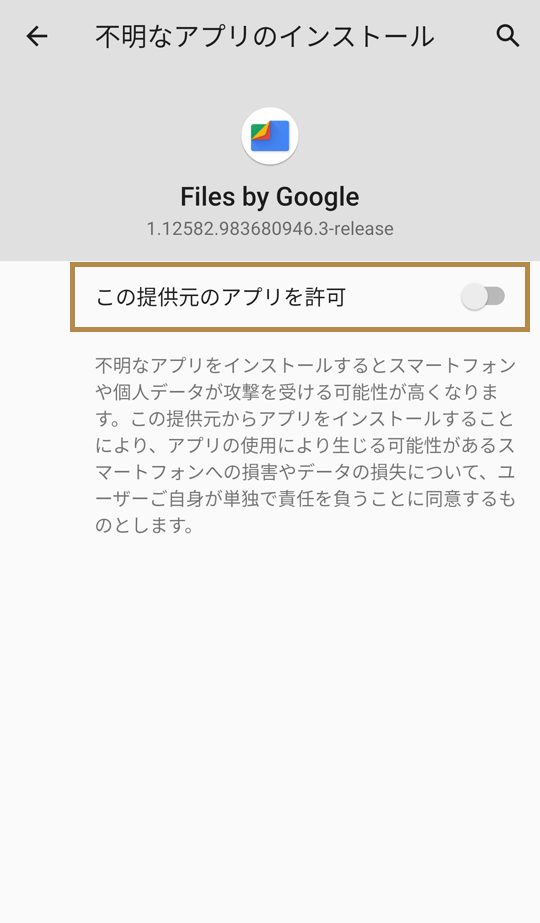
The "Allow from this source" screen - Press the Back button to return to the previous screen.
The install screen appears.
If a Google Play Protect warning appears
If you see a warning such as "Unverified developer", do the following.
- Tap "More details".
- Tap "Install anyway".
The installation continues.
- The "Unknown sources" and "Allow from this source" settings stay on after the installation. Turn them back off when the installation is done.
TipCheck that the APK is genuine
You can check that the downloaded APK is genuine with the file's SHA-256 hash and the signing certificate fingerprint. The steps are on the Releases page.
3. Install
- Tap "Install".
- When the installation is done, tap "Open".
reTONE starts. The reTONE icon is also added to your app list.
4. First launch
The first time you start reTONE, the following screens appear in order. Some may not appear, depending on the phone's Android version.
Storage permission (Android 6 and later)
On Android 6 and later, if a screen asks for access to storage, tap "Allow".
The songs on the phone appear in the library. If you do not allow access, no songs appear.
"Older version" notice (some phones on Android 14 and later)
On some phones running Android 14 and later, if you see the notice "This app was built for an older version of Android", tap "OK". This notice appears once for each Android version.
The next screen appears.
Choose how to use this device
The first time you start reTONE, the "How this phone is used" screen appears. You can change this later at the top of Settings.
- Dedicated music player: When you turn on the phone or press the HOME button, the reTONE playback screen appears instead of the Android home screen. You can open other apps and Android settings from inside reTONE. Notification and ringtone volumes are set to 0. This is called Silent DAP mode (a DAP is a dedicated music player), and you can turn it off in Settings.
- Music app: Your default home app does not change. You open reTONE from its icon, like any other app.
- If you choose "Dedicated music player", the volume of notification sounds, ringtones, and alarms is set to 0 (Silent DAP mode).
- If you uninstall reTONE while Silent DAP mode is on, the volume stays at 0. Turn it off in Settings before you uninstall (see "Before uninstalling").
- Tap either "Dedicated music player" or "Music app".
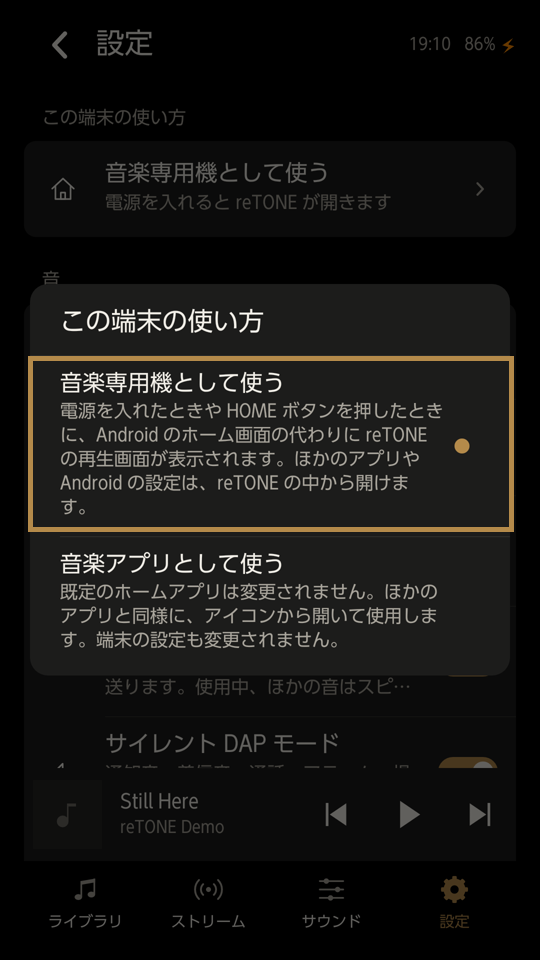
The "How this phone is used" screen
If you chose "Dedicated music player", continue with "Make reTONE your home screen". If you chose "Music app", you are done.
Make reTONE your home screen (if you chose the dedicated music player)
If you chose "Dedicated music player", do the following.
- Press the HOME button.
- When Android asks which app to use, choose reTONE from the list.
- Tap "Always".
Now the reTONE playback screen appears when you press the HOME button.
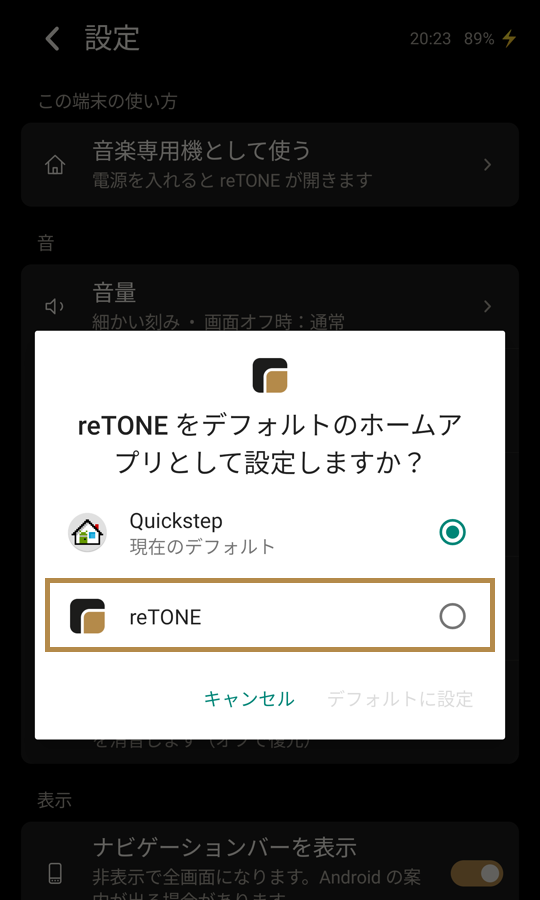
On Android 10 and later, a screen asking whether to make reTONE your home app appears right after you choose "Use as a dedicated music player". Choose "reTONE", then tap "Set as default". You don’t need the HOME button steps above.
TipIf no choice screen appears when you press HOME
If pressing the HOME button does not bring up the screen that asks which app to use, clear the default for your current home app, then choose again.
- Open "Apps" in Android settings.
- Open your current home app.
- Under "Launch by default" (or "Open by default"), clear the defaults.
- Press the HOME button again.
- Choose reTONE from the list.
- Tap "Always".
Now the reTONE playback screen appears when you press the HOME button.
Return to your original home screen
If the phone is set to "Dedicated music player" and you want your original home screen back, do the following.
- In reTONE's Settings, tap "How this phone is used".
- Choose "Music app".
- If a screen asks you to pick an app, choose your original home app.
- Tap "Always".
reTONE is removed from the HOME button choices, and pressing HOME shows your original home screen.
Add music
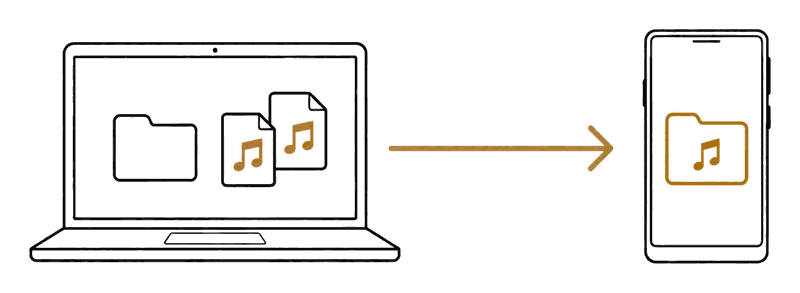
Copy music files from your computer to the phone's Music folder.
Detailed steps and cautions
Copy from a computer
You need a computer and a USB cable to connect the phone to it.
- Connect the phone to your computer with the USB cable.
- In the phone's notification, choose "File transfer (MTP)". On older phones, the computer may see the phone as soon as you connect it.
- On your computer, open the phone's storage. On Windows, it appears under "This PC". On a Mac, open it the same way as described in "If you use a Mac" in "Install".
- Open the phone's "Music" folder.
- Copy your music files into the "Music" folder.
The copied songs appear in the reTONE library. If they do not, see "If songs do not appear" below.
- You can organize folders any way you like.
- You can also put music on an SD card.
If songs do not appear
If you copied songs but they do not appear in the library, do the following.
- Tap the library menu (⋮).
- Tap "Refresh library".
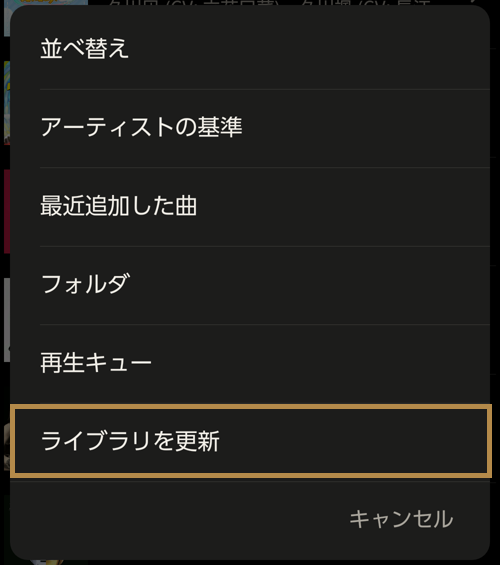
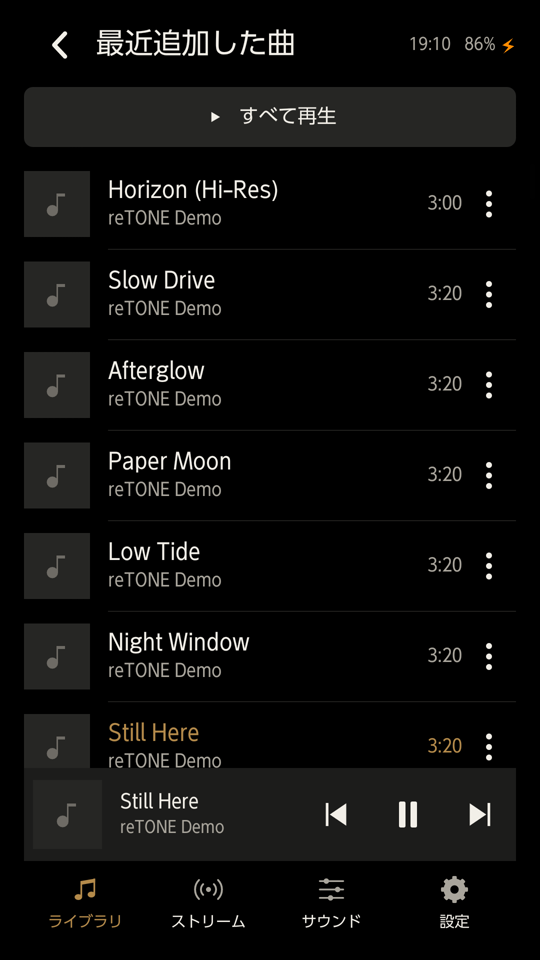
"Refresh library" in the library menu, and the songs that were added
You are done when reTONE shows how many songs it added, such as "12 tracks added".
TipIf songs still do not appear after "Refresh library"
- Check that the songs are not in a folder whose name starts with ".", a folder that contains a .nomedia file, the Android folder, or a ringtone folder. reTONE does not read these folders.
- On older versions of Android, new songs may not be registered until you restart the phone. Restart the phone, then check again.
Controls
These are the main controls on the playback screen. Library and lock screen controls are in the full list of controls.
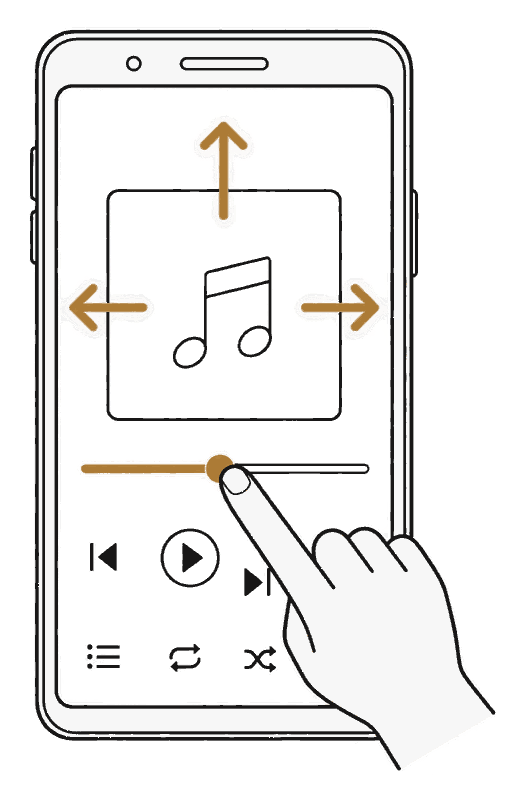
Detailed steps and cautions
Playback screen
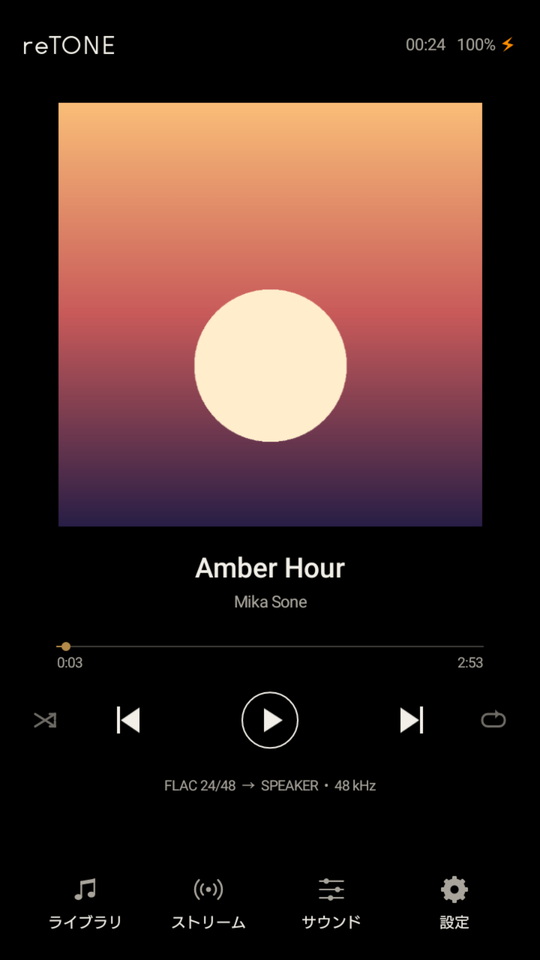
| Action | Result |
|---|---|
| Swipe the album art left or right | Goes to the previous or next song |
| Swipe the album art up | Shows the list of songs coming up. Swipe down at the top of the list to return to the playback screen |
| Drag the seek bar | Plays from where you lift your finger |
| Previous | If more than 3 seconds have played, goes to the start of the song. Within the first 3 seconds, goes to the previous song |
| Shuffle (far left) | When on, plays songs in a mixed-up order |
| Repeat (far right) | Each tap cycles through Repeat off, Repeat all, and Repeat one (shown with a "1") |
| Bottom line | Song format → output • sample rate. Example: FLAC 16/44.1 → 3.5mm STEREO • 48 kHz. DIRECT means the song is playing through a path that bypasses the Android mixer (direct output or offload, or USB DAC direct output). For direct output on Android 10 and later, this is based on what the phone reports |
Library
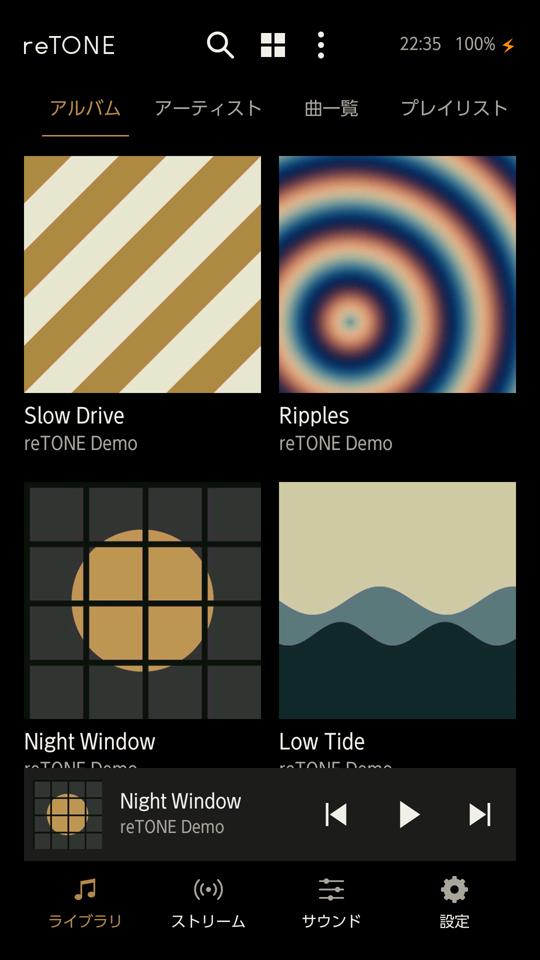
| Action | Result |
|---|---|
| Swipe the list left or right | Switches between the Albums, Artists, Tracks, and Playlists tabs |
| Search | Searches song titles, artists, and albums |
| View switch (Albums tab) | Cycles through large album art, small album art, and list |
| Menu (⋮) | Sort, Group artists by, Recently added, Folders, Queue, and Refresh library |
| Touch the strip on the right edge | Jumps to that letter (when sorted by name with 40 or more items) |
| ⋮ on a track | Play next, Add to end of queue, Add to playlist, and File info |
| An album's ⋮ | Adds all songs on the album to the end of the queue or to a playlist |
| Playlists | Create one with "New playlist" at the top. In a playlist, use ⋮ at the top right to rename or delete it, and ⋮ on a track to move it up or down |
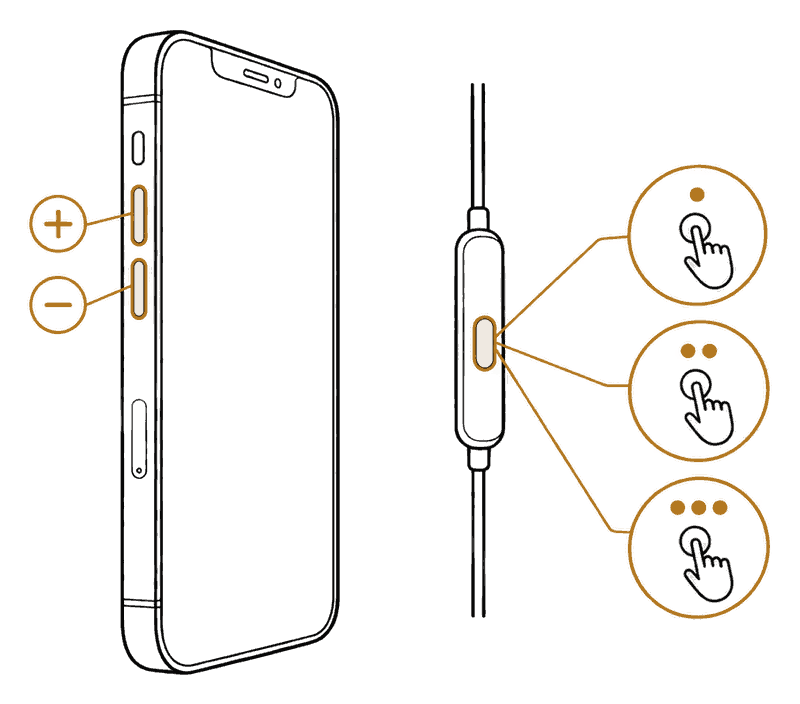
Buttons
| Action | Result |
|---|---|
| HOME button | Returns to the playback screen (when used as a dedicated music player) |
| Volume keys | Each press changes the volume by about 1 dB (when "Fine volume steps" is on) |
| Headphone button | Once: play/pause. Twice: next song. Three times: previous song |
| USB DAC | When you connect a DAC with an OTG cable, reTONE sends songs to the DAC without changing their sample rate, if the DAC supports that rate (on phones with USB host support) |
Lock screen (when using the reTONE lock screen)
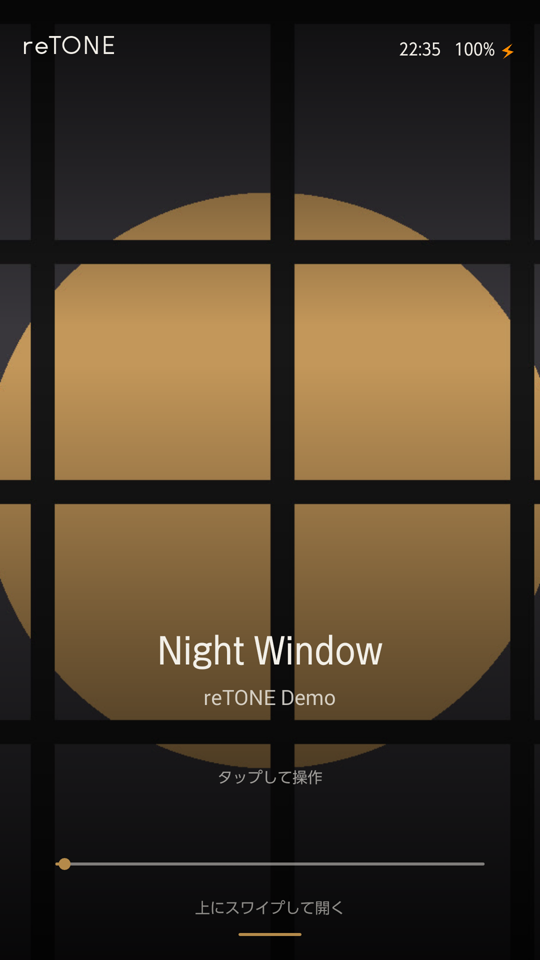
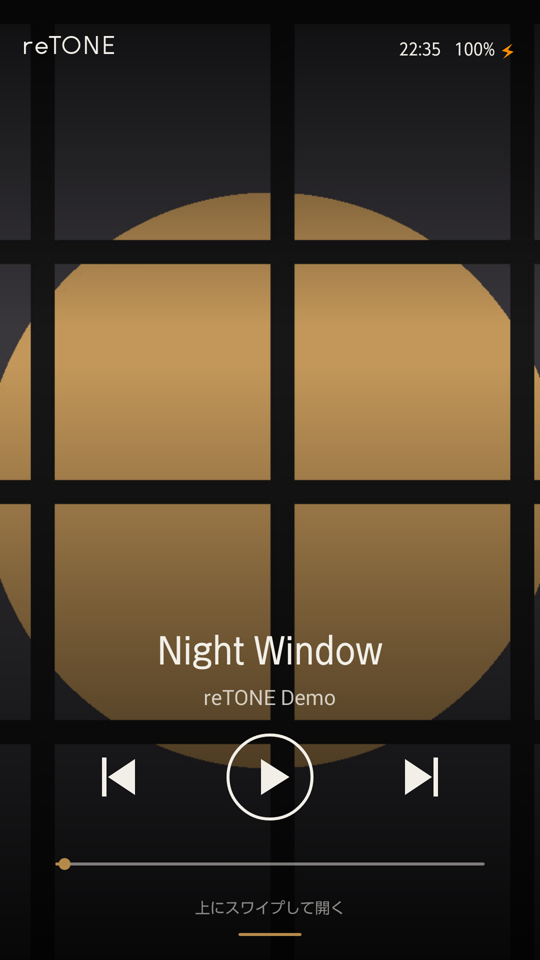
| Action | Result |
|---|---|
| Tap the screen | Shows the controls for 3 seconds |
| Swipe up | Unlocks the phone. If you have set a PIN or password, you are asked to enter it |
While a streaming app is playing, the screen switches to one that shows only the service name and playback controls.
Stream and Sound
"Stream" shows your NAS and your music streaming apps.
Use "Add a NAS" to register a NAS on the same Wi-Fi, or another reTONE that is sharing its music. Tracks on a registered NAS appear in your library. Turn on "Network features" in Settings first (see Play music from a NAS).
The streaming apps installed on the phone are listed below. Tap one to open it. To add an app that is not listed, use "Add an app".
"Sound" opens the phone maker's sound settings screen.
Settings
Open Settings from "Settings" in the bottom menu. The items shown depend on the Android version, the phone's features, and the devices you have connected (see "Items that vary by device"). The defaults below are the values after a fresh install.
Description of each item
How this phone is used
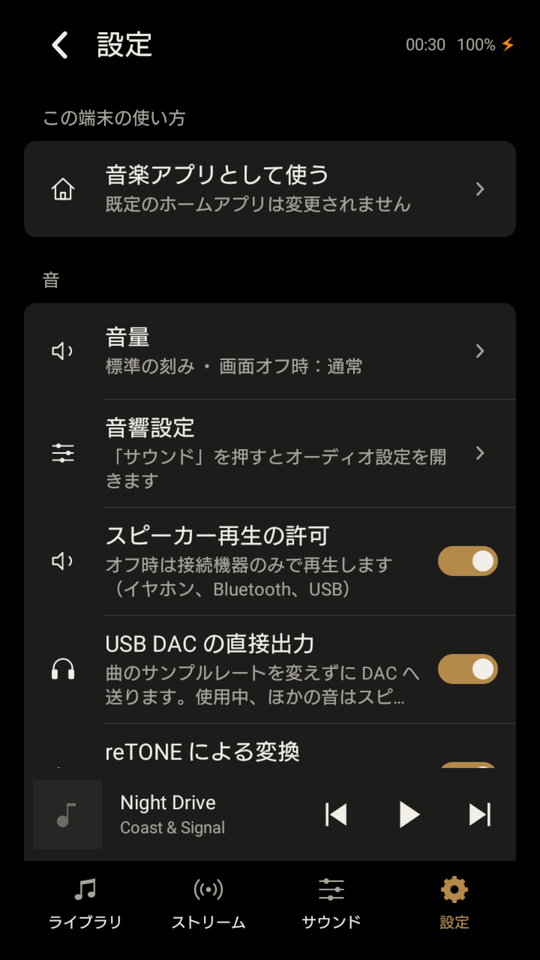
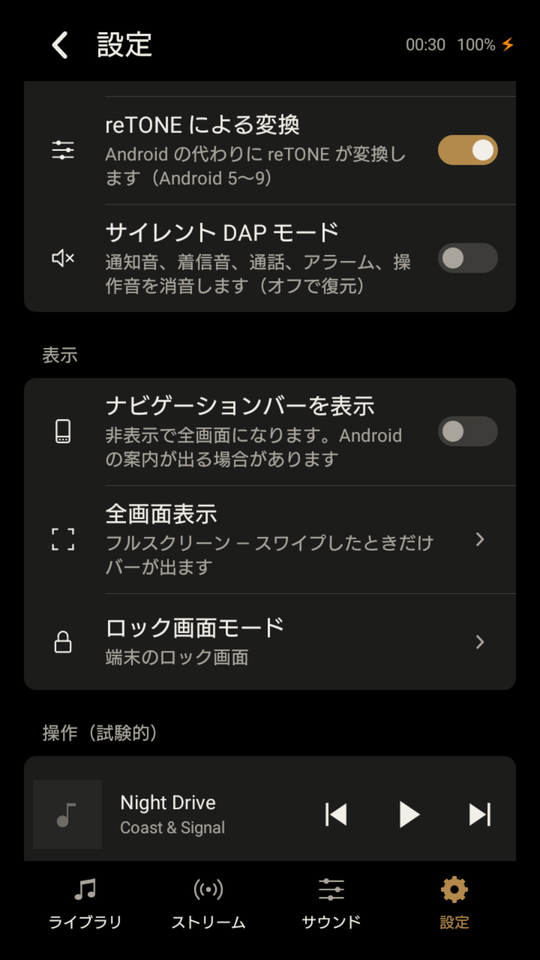
| Item | Description |
|---|---|
| Dedicated music player | reTONE opens instead of the phone's home screen when you turn on the phone or press the HOME button. When you choose this, reTONE shows instructions for making it your home screen |
| Music app | Use reTONE like a regular app. Your default home app does not change, and Silent DAP mode and the reTONE lock screen are turned off |
The same choice appears the first time you start reTONE. You can switch later at the top of Settings.
Sound
| Item | Description |
|---|---|
| Volume | Sets "Fine volume steps" and "Volume keys with screen off" (see the table below) |
| Sound settings | Chooses the screen that opens when you tap "Sound". You can choose the phone maker's sound settings (Dolby, Harman, and others) or Android's sound settings. By default, the maker's screen is used if there is one |
| Allow speaker playback | When off, reTONE plays only while headphones, Bluetooth, or a USB device is connected. On by default |
| Direct output | Outputs songs at their own sample rate (availability depends on the phone). The phone's sound effects (DTS and others) are not applied. On by default |
| Conversion by reTONE | For songs whose sample rate the Android mixer would convert, reTONE converts them first. On by default |
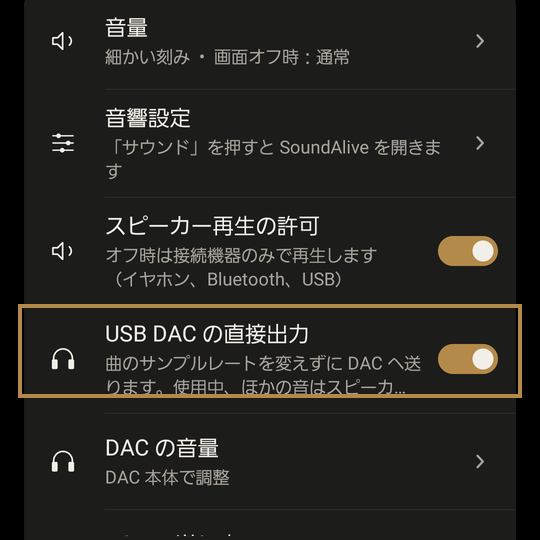
| USB DAC direct output | Sends songs to the USB DAC without changing their sample rate, if the DAC supports that rate. While in use, sound from other apps plays from the phone's speaker. On by default |
| DAC volume | Chooses whether to adjust volume on the DAC itself or with the phone's volume keys. reTONE also asks the first time you connect a DAC. Remembered for each DAC |
| Sending DSD | Chooses whether to send DSD as DSD or convert it to PCM. The default is to send it as DSD. If DSD songs cut out, choose “Convert to PCM.” Remembered for each DAC |
| Silent DAP mode | Mutes notification sounds, ringtones, calls, alarms, and touch sounds. Turning it off restores the original volume. On by default when used as a dedicated music player, off when used as a music app |
- Silent DAP mode also mutes alarms. If you use the phone as an alarm clock, turn it off
- To let only some of these sounds play, you still need to turn off Silent DAP mode. Raising a single volume in Android settings may not work, or the sound will be muted again the next time reTONE starts
- Turn off Silent DAP mode before you uninstall reTONE. If you uninstall it while the mode is on, the sounds stay muted
The items on the "Volume" screen are as follows.
| Item | Description |
|---|---|
| Fine volume steps | While reTONE is playing, each press of a volume key changes the volume by about 1 dB. When off, the volume changes in Android's volume steps. Off by default |
| Volume keys with screen off | When set to "Hold", pressing the volume keys does not change the volume while the screen is off. This keeps the volume from changing in your pocket. The default is "Normal" |
Display
| Item | Description |
|---|---|
| Full screen | Choose between Full screen (the bars appear only when you swipe) and Basic full screen (the bars appear when you touch the screen) |
| Show navigation bar | Chooses whether to show the strip of buttons such as Back and Home at the bottom of the screen (the navigation bar). Hiding it gives you a full screen. If you turn the screen off and quickly back on, Android may show a notice |
| Lock screen mode | Choose between “Device lock screen” and “reTONE lock screen” (album art across the whole screen). The default is “Device lock screen.” If you have set a PIN or password, you need to enter it to unlock in either case |
Controls (experimental)
| Item | Description |
|---|---|
| Keep notification panel closed | When you pull down the notification panel, it appears briefly and then closes. Off by default |
| Keep recent apps closed | Pressing the recent apps button returns you to reTONE. Does not work on some phones. Off by default |
On some phones, these settings can’t block them completely.
Apps and device
| Item | Description |
|---|---|
| Other home screens | Switches to another home screen installed on the phone. Press the HOME button to choose again |
| Device & audio | Shows information that can be read from the phone, such as the SoC, DAC, audio codec, output rate, and Android output paths |
| Android settings | Opens Android settings. Use it for networks, storage, managing apps, and more |
| About reTONE | Shows the version, the guide, and the terms of use |
Items that vary by device
| Item | Shown on these phones or situations | When not shown |
|---|---|---|
| Direct output | Android 10 and later (availability depends on the phone) | On Android 9 and earlier, an app has no way to check whether the phone can output a song at its own sample rate. For this reason, this item is not shown |
| Conversion by reTONE | Android 5 to 9 | On Android 4.x, reTONE always plays FLAC and WAV itself, so there is nothing to switch. On Android 10 and later, direct output takes priority |
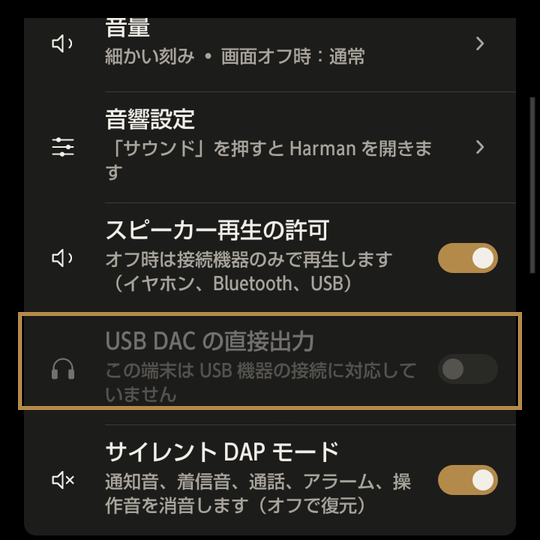
| USB DAC direct output | Shown on all phones | On phones that do not support USB devices (USB host), it is grayed out and says "This device does not support USB devices" |
| DAC volume | When reTONE is using a USB DAC | Not shown when no DAC is connected or when USB DAC direct output is off |
| Sending DSD | When reTONE is using a USB DAC that can play DSD directly and whose volume can be controlled over USB | With DACs that cannot play DSD directly, DSD songs are converted to PCM automatically, so there is nothing to choose |
| Show navigation bar | Phones with an on-screen navigation bar | Not shown on phones with physical Back and Home buttons. On phones running Android earlier than 4.4, the default is "Show" (when the bar is hidden, the first touch each time only brings the bar back) |
| Full screen | Shown on all phones | On Android earlier than 4.4, Full screen is not available, so only Basic full screen is offered |
| Keep recent apps closed | Android 4.4 and earlier | Not shown on Android 5 and later, because an app cannot check whether another app is in front |
| Other home screens | When used as a dedicated music player | Not shown when used as a music app, because the home screen has not been changed |
| Choices in Sound settings | Lists the sound settings screens on the phone (Dolby, Harman, DTS, Sony, LG Hi-Fi Quad DAC, and others) | On phones with no maker screen, only Android's sound settings is offered. A screen that could not be opened is marked "did not open on this device" |
- Some phones report USB host support but cannot actually use USB devices. Even if USB DAC direct output is shown, connect a DAC and check that it is recognized
Connect a USB DAC
You need a phone with USB host support (OTG) and an OTG cable. For older phones, we recommend a DAC with its own battery or power supply. The first time you connect a DAC, reTONE asks how to adjust its volume.
Detailed steps and cautions
With a USB DAC (an external D/A converter connected by USB, which turns digital audio data into analog audio), reTONE can send songs to the DAC without changing their sample rate, if the DAC supports that rate.
What you need
- A phone with USB host support (OTG). USB host is the feature that lets the phone act as the host and run USB devices. It is also called OTG.
- An OTG cable or adapter. With a regular cable for connecting to a computer, the phone will not recognize the DAC. If the phone has a micro USB port, use a micro USB OTG adapter. For combinations, see "Choosing a cable" below.
- Power for the DAC. Older phones can supply only a small current to external devices, so whether a DAC works depends on how it is powered. Use the table below as a guide when choosing one.
| Type of DAC | Power | On older phones |
|---|---|---|
| Portable amp type (built-in battery) | The DAC's own battery | The most reliable. It was recognized even on a phone from 2012 |
| Desktop type | Wall outlet | No power concerns, though not portable |
| Stick or dongle type (bus-powered) | Drawn from the phone | Most work on newer phones. On older phones, the light may turn on but the DAC may not be recognized |
TipHow much current to look for when choosing a DAC
- Phone side: under the USB 2.0 standard, a port can supply up to 500 mA at 5 V. The OTG standard for phones, however, only requires a minimum of 8 mA. How much a phone can actually supply varies by model and is rarely published. Older phones tend to supply less.
- DAC side: check the "current consumption" or "input current" in the product specifications. Bus-powered DACs range from small ones that run on a few tens of mA to ones that need several hundred mA. The lower the draw, the better the chance it works on an older phone.
- DACs with a built-in battery say so in their specifications. They draw very little from the phone, so the phone's limits do not matter.
- If the "USB DAC direct output" row in Settings is grayed out and says "This device does not support USB devices", you cannot use a USB DAC on that phone.
- Some phones cannot actually act as the host even though Android reports USB host support. Before you get a DAC, check with "Check in advance whether the phone can act as host" below.
Connect
Have the phone, cable, and DAC from "What you need" ready, then follow these steps.
- Connect the USB DAC to the phone.
- When Android asks whether to open reTONE, check "Use by default for this USB device" (on newer Android: "Always open reTONE when … is connected") and tap OK. You won’t be asked again, and the permission is kept. The exact wording depends on the Android version and the phone. If you are asked every time you plug in the DAC, make sure this box is checked.
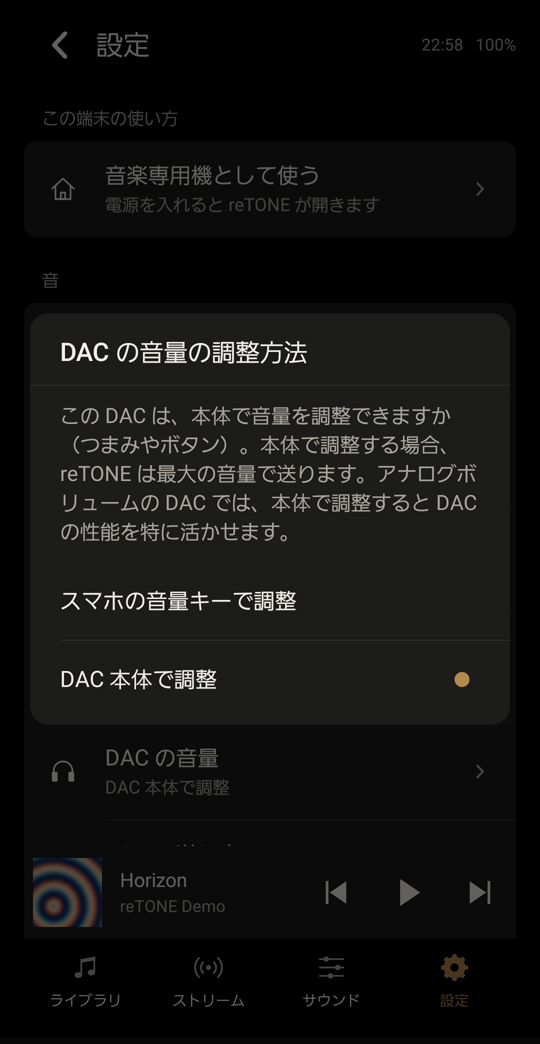
- For a DAC you are connecting for the first time, "How the DAC's volume is set" appears. Choose the option that fits your DAC.
- A DAC with a knob or buttons on the unit: choose "On the DAC". reTONE sends audio at full volume.
- Any other DAC, or if you are not sure: choose "With the phone's volume keys" or "Not sure (phone's volume keys)". Adjust the volume with the phone's volume keys.
- If you chose "On the DAC", turn down the volume on the DAC.
- Tap "Continue".
- Play a song.
- If you choose "On the DAC", reTONE sends audio at full volume. Turn down the volume on the DAC before you tap "Continue".
- If you play without turning the volume down, the sound may be very loud.
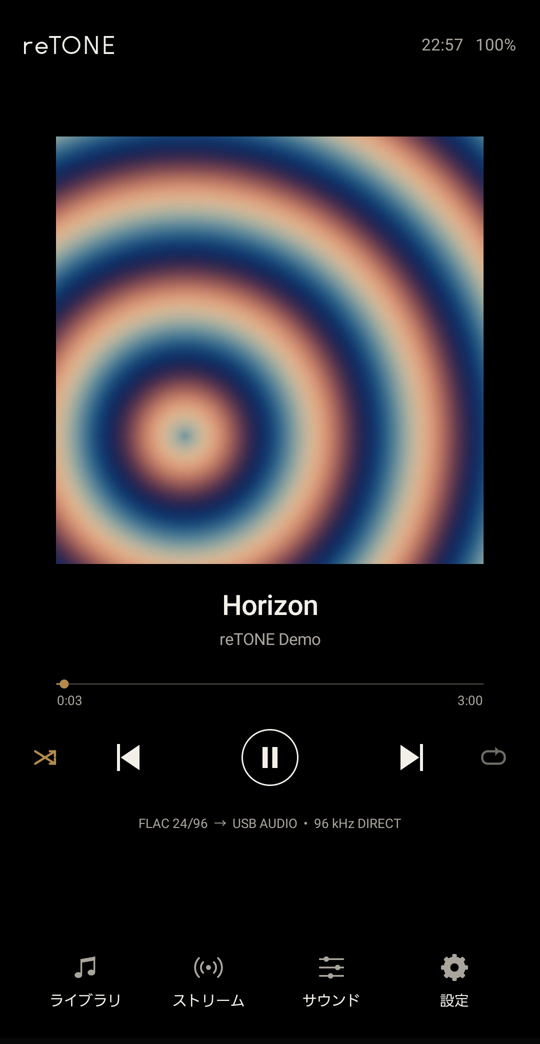
You are done when the bottom line of the playback screen shows something like "USB AUDIO • 96 kHz DIRECT".
- DIRECT means reTONE is sending the song to the DAC without changing its sample rate. For songs at a rate the DAC does not support, reTONE converts them before sending, and DIRECT is not shown.
- With a DAC that supports native DSD and lets its volume be controlled over USB, DSD songs show something like "DSD64 → USB AUDIO • DSD64 DIRECT".
- Your choice in "How the DAC's volume is set" is remembered for each DAC model. You can change it with "DAC volume" in Settings.
Check the phone and cable
TipCheck in advance whether the phone can act as host
Have an OTG adapter and a USB mouse or USB flash drive ready.
- Connect the OTG adapter to the phone.
- Connect the USB mouse or USB flash drive to the OTG adapter.
If the screen responds to the mouse, or you can see the contents of the flash drive, the phone can act as host.
Choosing a cable
USB cables have a "host" direction. Choose a combination where the phone is the host and the DAC is the device. Only USB-C to USB-C cables have identical ends and work either way (the devices decide which one is the host).
| Phone port | DAC port | What to use |
|---|---|---|
| micro USB | USB-C | An OTG cable where the micro USB end is the host (clearly labeled "OTG"), or a micro USB OTG adapter (micro USB male → USB-A female) + a USB-A → USB-C cable (with data support) |
| micro USB | micro USB | A micro USB to micro USB OTG cable (only one end is the host. Plug the "OTG" end into the phone. If you cannot tell which end, try both ways), or an OTG adapter + a USB-A → micro USB cable |
| USB-C | micro USB | A USB-C → micro USB cable where the USB-C end is the host (the product description says something like "USB-C end is host") |
| USB-C | USB-C | A standard USB-C to USB-C cable |
- Charge-only cables do not work. They have no data wires.
- Single OTG cables that connect a micro USB phone to a USB-C DAC vary from product to product. Choose one clearly labeled as OTG compatible. If the DAC's light turns on but it is not recognized, try an OTG adapter with a USB-A → USB-C cable instead.
- Small adapters that convert between micro USB and USB-C do not work in either direction. With a micro USB female → USB-C male adapter, the phone does not become the host. A USB-C female → micro USB male adapter is not allowed by the standard, and its behavior differs from product to product. Use an OTG adapter with USB-A in between (for a USB-C phone, a USB-C male → USB-A female OTG adapter).
TipCheck what your DAC supports
In reTONE's Settings, the "USB DAC" row under "Device & audio" shows the name and capabilities of the connected DAC (such as "UAC2, up to 384 kHz, 32-bit" or "Native DSD" and "DAC volume control"). When no DAC is connected, it shows "USB host reported by Android (plug in a USB device with OTG to see if it really works)".
While you use it
- While the DAC is in use, sound from other apps (ringtones, notification sounds, video audio, and so on) plays from the phone's speaker. It plays from the speaker even if your headphones are connected to the DAC.
- When you unplug the DAC, playback pauses.
- With a DAC whose volume can be controlled over USB, the volume keys change the DAC's own volume. With a DAC set to "On the DAC", pressing the volume keys does not change the volume.
TipIf you want sound from other apps to play through the DAC too
Turn off "USB DAC direct output" in Settings. reTONE hands the DAC back to Android, and sound plays through Android's audio path. reTONE's playback also goes through Android's path, so sample rate conversion or reduction to 16-bit may occur.
TipIf other apps play no sound through the DAC after reTONE was force-closed
If reTONE closes while it is holding the DAC, the DAC may not be handed back to Android.
- In reTONE's Settings, turn off "USB DAC direct output" (reTONE hands the DAC back to Android).
- If there is still no sound, unplug the DAC and plug it back in.
Other apps can now play sound through the USB DAC.
TipIf you hear crackling noise
The phone's radio signals (Wi-Fi, mobile data, Bluetooth) can travel through the cable and enter the DAC as noise. This tends to happen more on older phones. Turn off the radios and check whether the noise goes away.
- Put the phone in airplane mode.
- Check that Wi-Fi is off.
- Check that Bluetooth is off.
- Check whether the noise goes away.
If the noise goes away, keep Wi-Fi, mobile data, and Bluetooth off while you listen. Playback doesn't need a connection, so it plays fine with them off. A short cable or a cable with a noise filter may also reduce the noise.
Remote control
Control reTONE from reTONE on another phone, over Bluetooth. The sound comes from the phone being controlled (and any DAC or headphones plugged into it). No Wi-Fi or internet needed.
Steps and notes
While connected, all of reTONE on the phone in your hand controls the other phone: Now Playing, the library, Up next and the queue, even the volume keys.
- Android to Android only. You can’t control it from an iPhone.
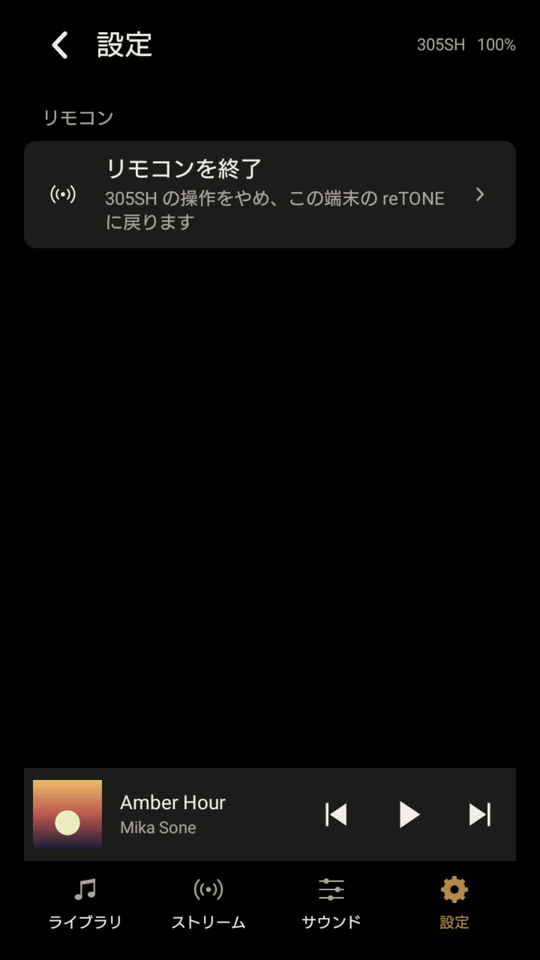
- "Sound" (the maker’s sound settings) and "Stream" are operated on the phone being controlled; tapping them on the phone in your hand shows "Use (device name) itself for this". reTONE’s settings are changed on the phone being controlled too (during remote control, Settings shows only "End remote control").
- With a USB DAC, Bluetooth radio can leak in as noise.
First time: pair the phones
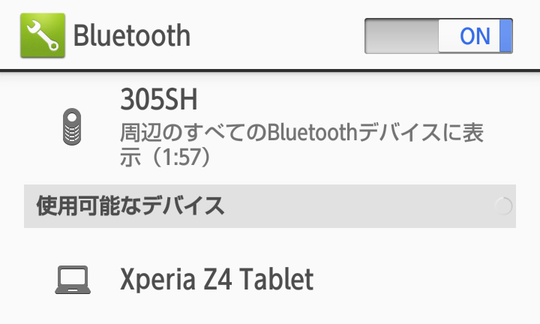
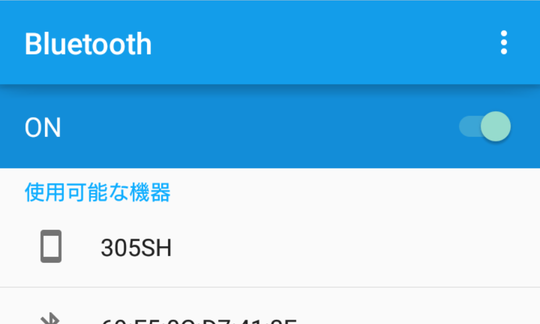
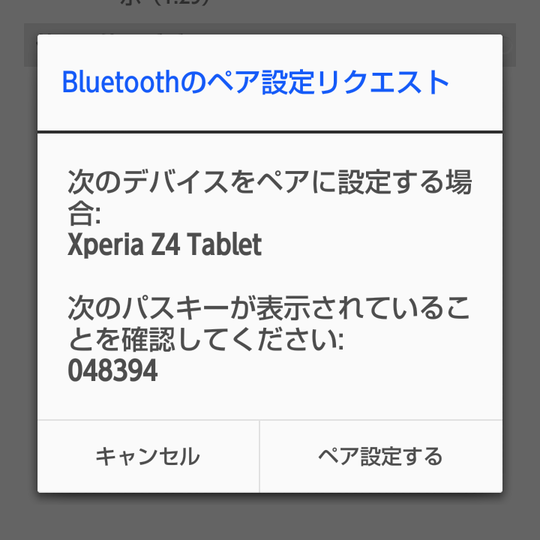
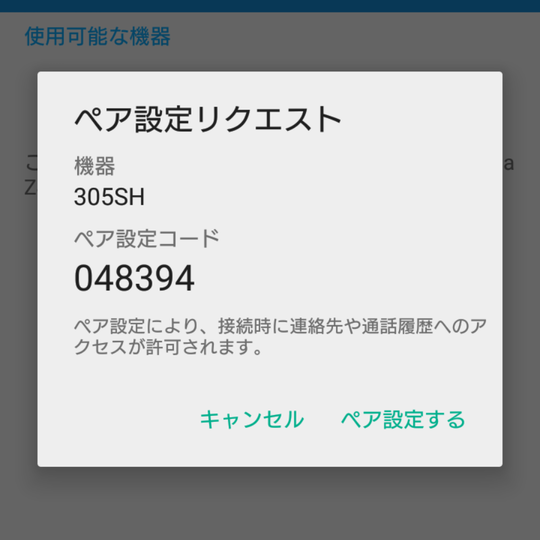
- On the phone being controlled (the one playing the music), open Android’s Bluetooth settings and make it visible to other devices. On some Android versions, tap the device name at the top of the screen to make it visible for a few minutes.
- On the phone in your hand, select the phone being controlled in Bluetooth settings and pair.
Connect
- On the phone being controlled, turn on "Remote control" in reTONE’s Settings.
- On the phone in your hand, tap "Control another reTONE" in reTONE’s Settings.
- Pick the phone being controlled under "Phone to control". The list shows "Last connected" first, then "Controlled before", then "Paired". Headphones, cars and the like are hidden; tap "Show other Bluetooth devices" to see them.
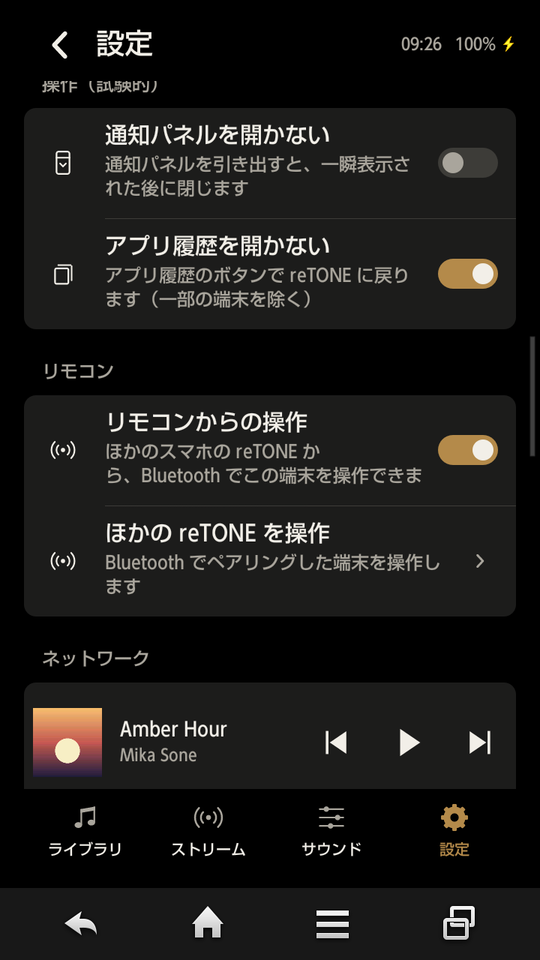
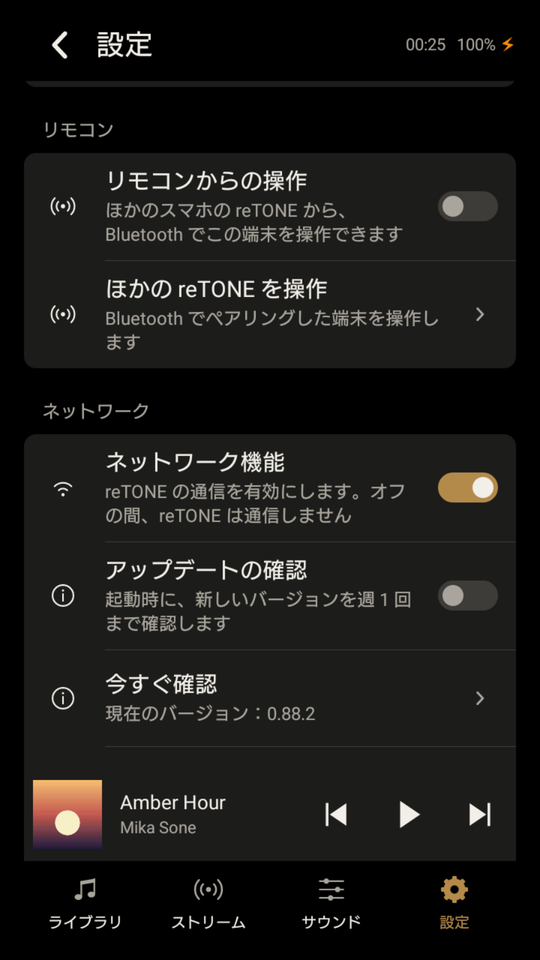
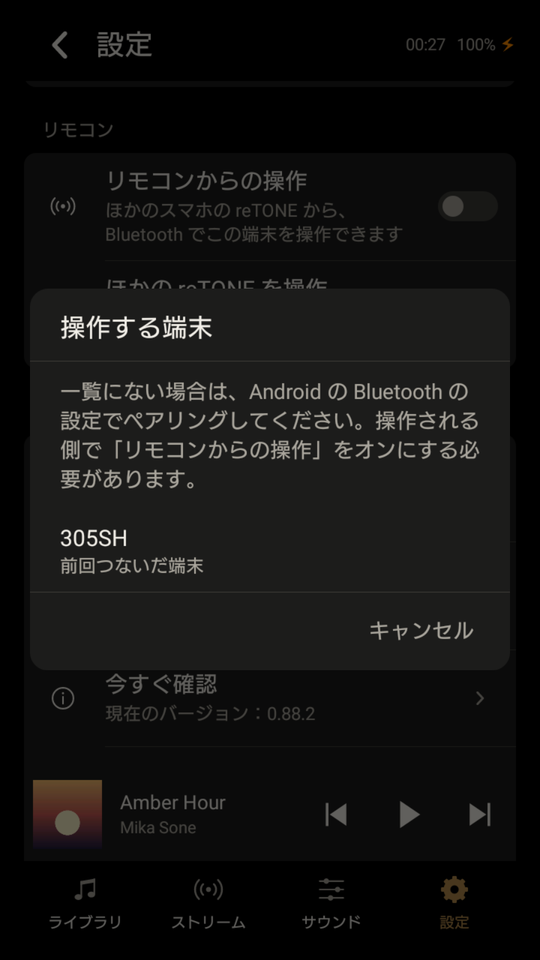
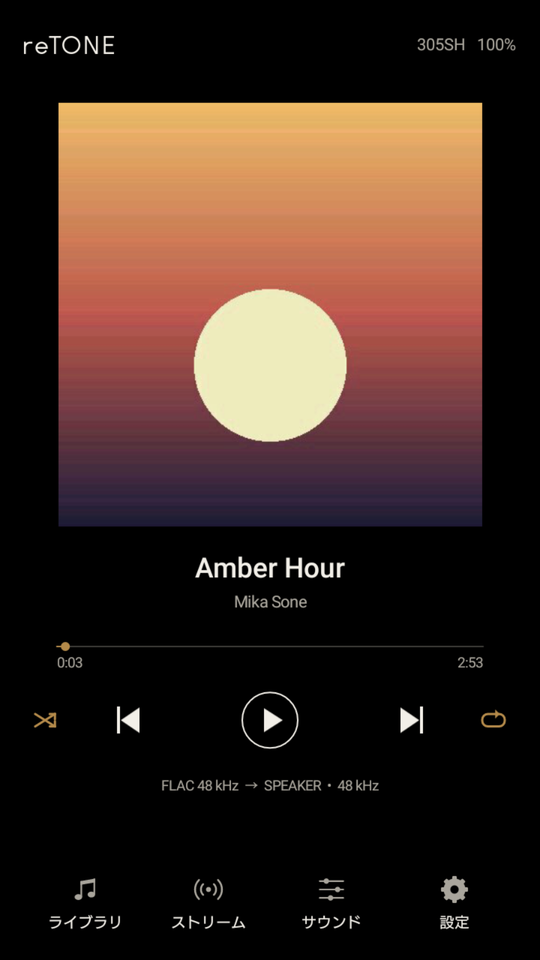
You’re connected when reTONE turns into the other phone’s controls, with its name and battery level at the top right. The first connection can take a while as the library comes across; after that it’s quick.
To stop
On the phone in your hand, tap "End remote control" in reTONE’s Settings. You’re back in your own reTONE, along with whatever you were playing before.
If it doesn’t work
| Message or symptom | Check |
|---|---|
| "Couldn’t connect to (device name)" | That "Remote control" and Bluetooth are on, on the phone being controlled |
| The phone isn’t in the list | That the phones are paired in Android’s Bluetooth settings |
| "Disconnected" | That you’re within Bluetooth range, and the other phone’s power and Bluetooth |
Play music from a NAS
Play music from a NAS (a DLNA media server) on the same Wi-Fi, right in reTONE’s library. Songs on the phone and on the NAS sit together in one library.
Steps and notes
NAS songs load onto the phone as they play (temporary storage). Anything already loaded keeps playing even when the NAS is out of reach. Everything else about reTONE’s playback, such as unconverted output and USB DAC direct output, works as usual.
- "Network features" must be on. It’s off by default, and while it’s off reTONE makes no network connections.
- Works with DLNA (UPnP) media servers. Windows shared folders (SMB) aren’t supported.
- Temporary storage uses free space on the phone.
Add a NAS
- Turn on "Network features" in reTONE’s Settings and tap "Turn on" to confirm. If you’re not on Wi-Fi, tap "Open Wi-Fi settings" and connect in Android’s Wi-Fi settings.
- Tap "Stream" in the bottom menu, then "Add a NAS" under "NAS".
- Tap "Add" next to your NAS under "NAS found on this Wi-Fi". reTONE starts loading the song list.
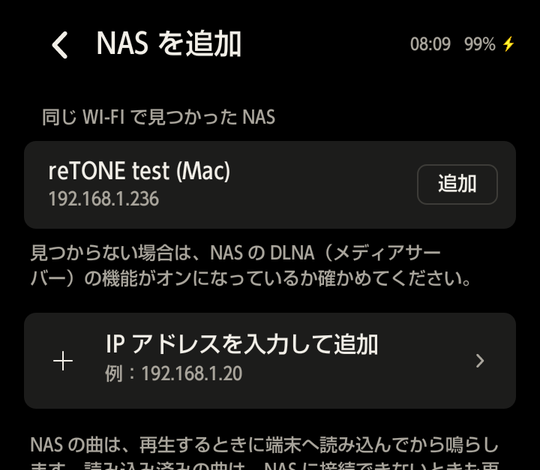
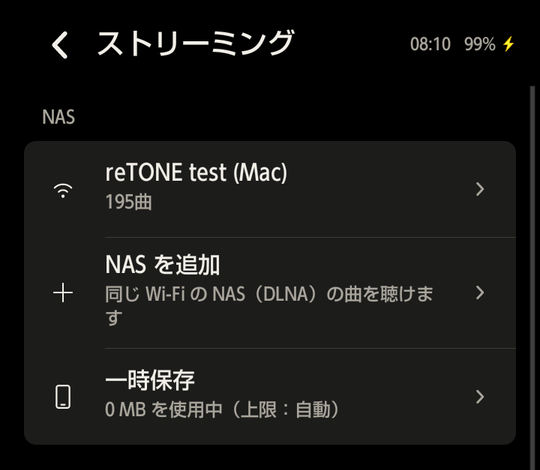
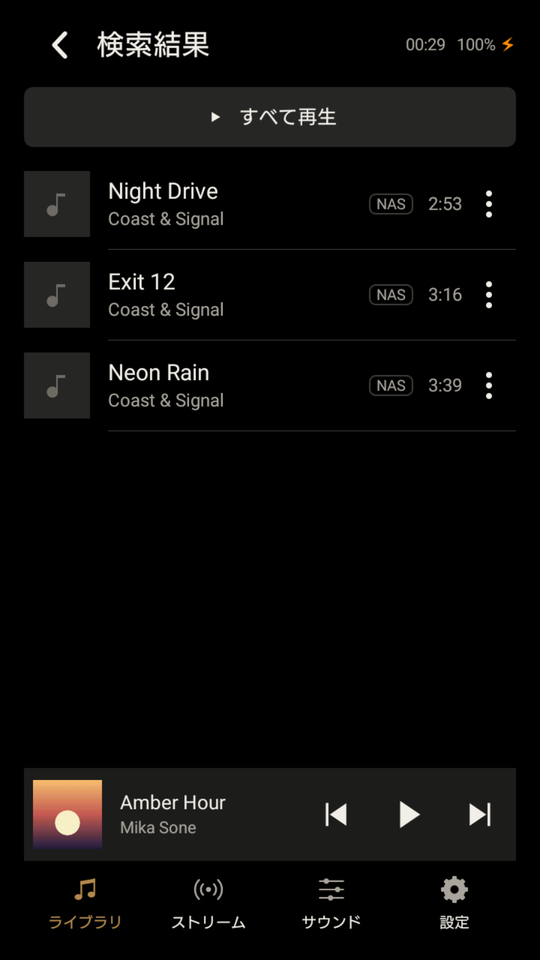
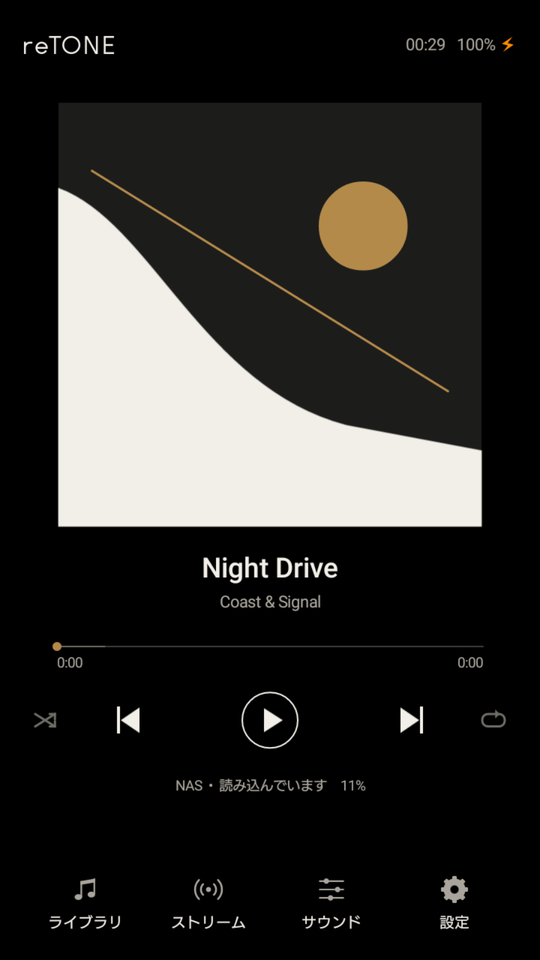
Done when the NAS songs appear in your library. NAS songs and albums carry a "NAS" tag; albums only partly on the NAS say "Partly NAS". Tap a song and it plays while loading, with "NAS •" at the bottom of Now Playing, and "Copying" while it loads.
TipIf your NAS doesn’t show up
Make sure the NAS’s DLNA (media server) feature is on. If it still doesn’t appear, use "Add by IP address" and enter the NAS’s address (for example, 192.168.1.20).
Manage
| Where | What you can do |
|---|---|
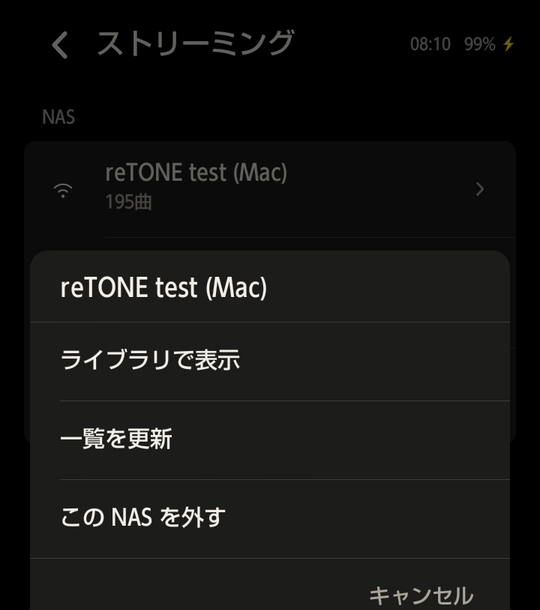
| Tap a NAS in Stream | "Show in Library" (only that NAS’s songs), "Refresh the list" (after adding music to the NAS), "Remove this NAS" |
| "Temporary storage" in Stream | "Temporary storage size" (Auto, 500 MB, 1 GB, 2 GB, 4 GB) and "Clear temporary storage". The default, Auto, fits the free space |
| "Show tracks" in the library’s ⋮ | All (this phone and NAS), This phone, or one NAS |
TipIf songs seem to have vanished from your library
Tapping "Show in Library" on a NAS in Stream switches the library to show only that NAS’s songs. Nothing has been deleted. Tap ✕ on "Only (name)" below the library tabs, or choose "All" under "Show tracks" in the library menu (⋮), to see everything again.
If it doesn’t work
| Message or symptom | Check |
|---|---|
| "Can’t reach the NAS (name), so NAS tracks not yet copied are hidden" above the library | That you’re on the same Wi-Fi, and the NAS is on. Close the banner with ✕ |
| "Skipped a track: the NAS can’t be reached" | Same as above |
| Dropouts | On older phones, loading and playing at the same time can be heavy. It settles once loading finishes |
Use a phone as your NAS
Turn a phone running reTONE into a NAS, and play its music from reTONE on another phone (sharing between phones). Only reTONE devices you’ve allowed can listen. With tethering, it works away from home too.
Steps and notes
On the listening phone, the shared songs show up in the library just like NAS songs, and play while loading. Over tethering, traffic stays between the two phones and uses no mobile data.
- Turn on "Network features" in reTONE on both phones.
- This feature is meant for use between phones you own.
- Sharing stops on its own when the Wi-Fi changes (including when tethering starts or stops) and after an hour without use. A notification shows while sharing; tap "Stop" in it to stop.
- The music itself isn’t encrypted. Connections are checked for permission and protected against impersonation and replay.
Connect
- On the sharing phone (the one with the music), turn on "Network features" in reTONE’s Settings, then turn on "Share this phone’s music". The first time, tap "Share" to confirm.
- On the listening phone, tap "Add a NAS" in reTONE’s Stream.
- Under "NAS found on this Wi-Fi", tap "Add" next to "reTONE on (the sharing phone’s name)".
- The first time you pair these two, the listening phone shows a six-digit code, and the sharing phone shows "Allow a connection" with the same code (from a notification, if reTONE isn’t open).
- Check the codes match and tap "Allow" on the sharing phone.
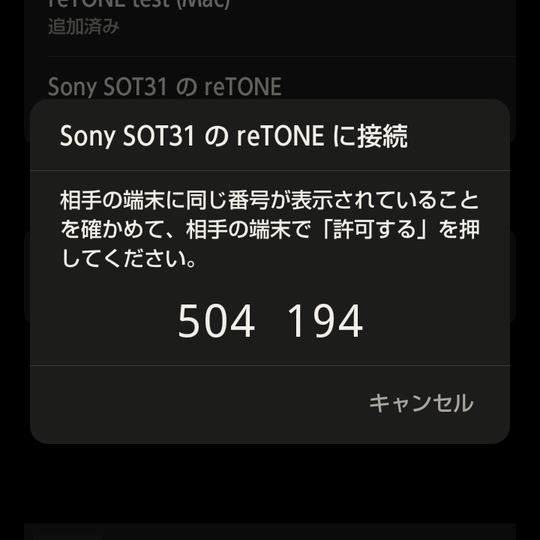
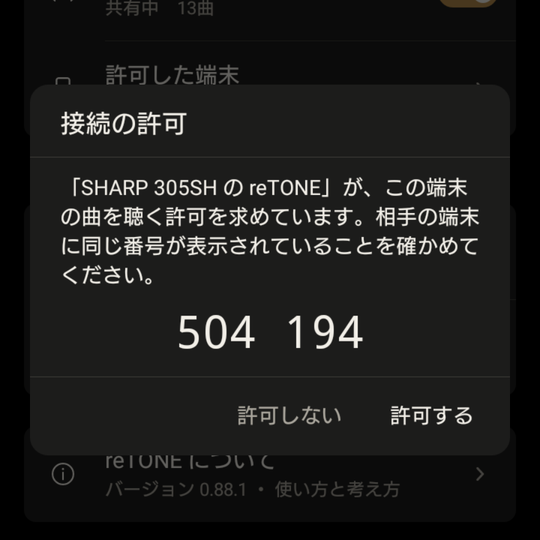
Done when the sharing phone’s music appears in the listening phone’s library. Next time, just turn on sharing on the sharing phone.
TipRemove an allowed device
In reTONE on the sharing phone, remove it from "Allowed phones" in Settings. To listen again, pair from the start.
Use it over tethering
- Turn on Wi-Fi tethering on the sharing phone.
- Connect the listening phone to the sharing phone’s tethering Wi-Fi.
- Turn on "Share this phone’s music" in reTONE on the sharing phone. Starting tethering stops sharing, so turn it on after tethering is up.
- On the listening phone, tap the sharing phone in the NAS section of Stream, then "Refresh the list".
- While tethering, the "Wi-Fi" row in reTONE on the sharing phone reads "Tethering (this phone is the hotspot)".
- On some phones, tethering turns itself off after a few minutes of no use. That setting lives in Android.
If it doesn’t work
| Message or symptom | Check |
|---|---|
| "Couldn’t connect" | That sharing is on, on the sharing phone |
| "Not allowed" | "Don’t allow" was tapped on the sharing phone. Start again from "Add a NAS" |
| "Sharing stopped" | The Wi-Fi changed, or an hour passed without use. Turn sharing back on, on the sharing phone |
Use adb
This method is for people who are comfortable with computers. adb is an Android development tool from Google. It lets you install apps and copy music to the phone from a computer over USB. Use it when the phone has no file manager app and cannot open this site in a browser (common on Android 4.x phones), or when you add music from a Mac.
- adb is a development tool that lets a computer control the phone directly. Running commands that are not in these steps may delete apps or data.
- If you do not understand these steps, do not use adb. Install with Method A or Method B in "Install", and add music as described in "Add music".
- If several phones are connected to your computer, connect only the phone you want to use before you run any commands.
Detailed steps and cautions
1. Turn on USB debugging on the phone
The location and names of these items vary slightly by Android version and phone maker.
- Open "Settings" › "About phone" (it may be called "About device").
- Tap "Build number" 7 times in a row. "Developer options" is added to Settings.
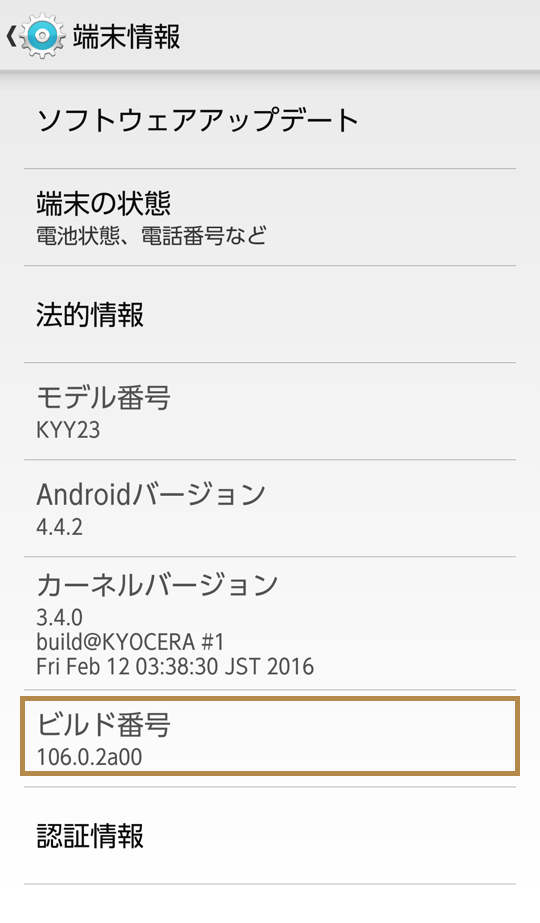
"Build number" in "About phone" on Android 4.4 - Open "Settings" › "Developer options".
- Turn on "USB debugging".
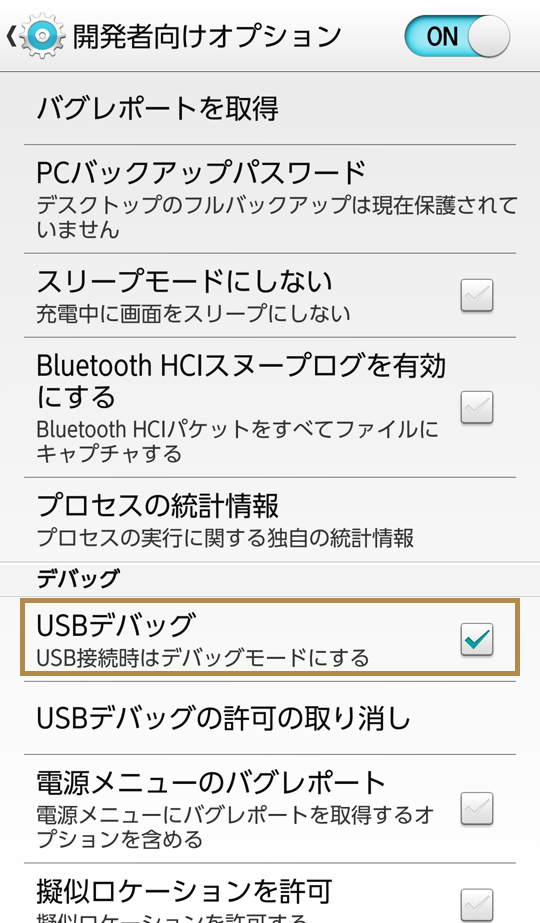
"USB debugging" in "Developer options" on Android 4.4
You are done when "USB debugging" is on in "Developer options".
2. Install adb on your computer
You need a Windows or Mac computer.
- Download Google's "SDK Platform-Tools" (for Windows or Mac). The link goes to the official Android developer site.
- Extract the downloaded file.
You are done when adb is in the "platform-tools" folder.
On a Mac, you can also install it with Homebrew (brew install android-platform-tools).
3. Connect the phone
- Connect the phone to your computer with a USB cable.
- When the phone shows "Allow USB debugging?", tap "OK".
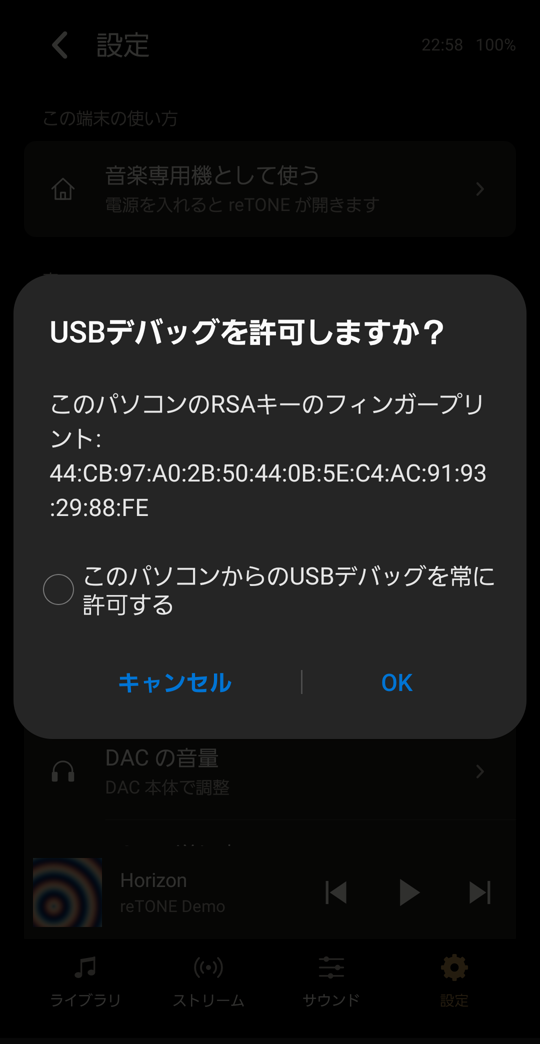
The "Allow USB debugging?" dialog on the phone
In "4. Install reTONE", you will check that the phone appears when you run adb devices.
4. Install reTONE
First, download the APK to your computer.
- Put the downloaded APK in the "platform-tools" folder.
- Open Terminal on a Mac, or Command Prompt or PowerShell on Windows.
- Go to the "platform-tools" folder (type cd and a space, drag the folder into the window, then press Enter). On a Mac, type
./adbinstead ofadbin the commands below (for example,./adb devices); in Windows PowerShell, type.\adb. - Run
adb devices. - Check that a serial number followed by "device" appears.
- Run the command with the name of the file you downloaded, for example
adb install reTONE-0.86.0.apk. In Windows PowerShell, type it as.\adb install reTONE-0.86.0.apk. To update an earlier version, add-r(for example,adb install -r reTONE-0.86.0.apk).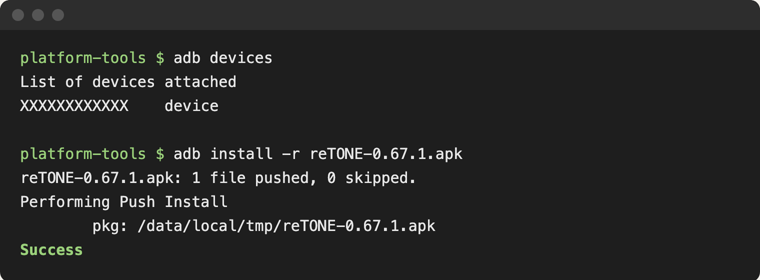
Running adb devices and adb install in Terminal, with Success shown
You are done when "Success" appears.
5. Add music
Complete "3. Connect the phone" first.
- Open Terminal on a Mac, or Command Prompt or PowerShell on Windows, and go to the "platform-tools" folder.
- Run
adb devicesand check that the phone's ID and "device" appear. - Run the command with your music folder, for example
adb push "music folder" /sdcard/Music/. The whole folder is copied into the phone's "Music" folder. In Windows PowerShell, type it as.\adb push "music folder" /sdcard/Music/. - On the phone, open reTONE and tap "Refresh library" in the library menu (⋮).
You are done when reTONE shows a message such as "12 tracks added".
- If the folder name contains spaces, put it in double quotes ("). If you drag the folder into Terminal, its location is typed in for you.
- To copy to an SD card, change the destination to the SD card's location. The location varies by phone.
- USB debugging stays on after you finish. Turn it off when you are done. While it is on, any computer connected over USB can control the phone.
Troubleshooting
- If nothing appears in
adb devices: check that the USB cable supports data, then try another cable or port. On Windows, you may need the phone maker's USB driver. - If "unauthorized" appears: unlock the phone, reconnect it, and tap "OK" in the permission dialog.
- If "INSTALL_FAILED_VERIFICATION_FAILURE" appears: newer versions of Android may ask for permission to install on the phone's screen. Turn on the screen, answer the prompt, and run the command again.
Before uninstalling
Before you uninstall, turn off "Silent DAP mode" in Settings, and choose "Music app" in "How this phone is used". If you uninstall while Silent DAP mode is on, notification and ringtone volumes stay at 0. Your playlists and settings are deleted along with the app.
Detailed steps and cautions
reTONE has two features that change the phone's settings. Before you uninstall, undo them in this order.
- In reTONE's Settings, turn off "Silent DAP mode".
- In reTONE's Settings, under "How this phone is used", choose "Music app". reTONE is no longer the default home app.
- Uninstall reTONE from "Apps" in Android settings.
reTONE is uninstalled.
- If you uninstall while Silent DAP mode is on, the volume of notification sounds and ringtones stays at 0.
- Your playlists and settings are deleted along with the app. Before you uninstall, write down the song order of any playlists you want to keep.
TipIf you notice after uninstalling that notification sounds do not play
Raise the volume of notification sounds and ringtones again in "Sound" in Android settings. Even after reTONE is uninstalled, you can restore the volume in the phone's settings.